2017年12月28日 星期四

JS 處理 number 和一些簡單的 helpers
這一陣子開發前端比較多,少了很多 rails 的 helper 可以用,光是要簡單的 floor 一個 number 到特定的 precision 就得自己寫 function 實作,實作時就還得考慮各種 edge case (WTF...),最後還是偷懶用了 lodash,真的挺省心的
https://github.com/lodash/lodash
之前看到有人說自己實作 lodash 的 functions 很適合拿來練 JS 手感,有空也來練練好了
另外 JS 處理數字真的很悲劇,字串相加是字串,字串相減是數字...我操...
```js
"1" + "1"
// => "11"
"1" - "1"
// => 0
```
我也是醉了...
加上我現在的工作是在做數字貨幣相關,數字貨幣動輒小數點後八九位,最小到 18 位,JS 的 number 根本是悲劇,後來找了一個叫做 mathjs 的 library 有 math.bignumber 可以用,就先湊合著用了
https://github.com/lodash/lodash
之前看到有人說自己實作 lodash 的 functions 很適合拿來練 JS 手感,有空也來練練好了
另外 JS 處理數字真的很悲劇,字串相加是字串,字串相減是數字...我操...
```js
"1" + "1"
// => "11"
"1" - "1"
// => 0
```
我也是醉了...
加上我現在的工作是在做數字貨幣相關,數字貨幣動輒小數點後八九位,最小到 18 位,JS 的 number 根本是悲劇,後來找了一個叫做 mathjs 的 library 有 math.bignumber 可以用,就先湊合著用了
git ignore globally
➜ ~ touch . gitignore_global
➜ ~ vim . gitignore_global
➜ ~ git config --global core.excludesfile '~/.gitignore_global'
https://gist.github.com/subfuzion/db7f57fff2fb6998a16c
讓 VSCode 識別 .js 成 JavascriptReact jsx 這樣才可以 autocomplete
因為上網找好幾次了很煩,註記一下
在設定裡面加上
```
{
"files.associations": {
"*.js": "javascriptreact"
}
}
```
以 rails + webpacker 為例
```
{
"files.associations": {
"**/app/javascript/**/*.js": "javascriptreact"
}
}
```
https://github.com/Microsoft/vscode/issues/81
在設定裡面加上
```
{
"files.associations": {
"*.js": "javascriptreact"
}
}
```
以 rails + webpacker 為例
```
{
"files.associations": {
"**/app/javascript/**/*.js": "javascriptreact"
}
}
```
https://github.com/Microsoft/vscode/issues/81
2017年12月26日 星期二
sass override bootstrap var
$grid-columns: 24;
$grid-gutter-width: 30px;
$body-bg: #ffffff;
$brand-primary: #394a5c;
$brand-success: #87c599;
2017年12月18日 星期一
TLDR 系列 - Why I find Iota deeply alarming
https://hackernoon.com/why-i-find-iota-deeply-alarming-934f1908194b
Etherium 的 core developers 之一提出認為 IOTA 的技術上問題點:
1. 不好的技術決策
戰 IOTA 使用三進位制的決策,認為弊大於利
2. IOTA 用了自己的加密技術
原 PO 認為使用加密技術的 best practice 就是不要自己發明新的加密技術
3. 對開源不友好
IOTA cofounder 針對第二點的回應是「他們是故意的」,為的是防止抄襲,也就是說真正最重要的地方(加密)是沒有公開的
4. 認為現在 POW 的機制是有安全問題的
細節沒看懂
2017年12月16日 星期六
deploy rails 前如何在 production 環境設好 redis
幾個重點
1. 安裝 redis
2. 根據官方建議做好設定 https://redis.io/topics/quickstart
3. 設防火牆
4. 確定sidekiq 是用你剛剛設定的 port
5. 確定 sidekiq 是用 redis https://github.com/mperham/sidekiq/wiki/Using-Redis
6. 把 sidekiq 加到 systemd
7. 讓 capistrano 重啟 sidekiq
1, 2
```
wget http://download.redis.io/redis-stable.tar.gz
tar xvzf redis-stable.tar.gz
cd redis-stable
make
sudo cp src/redis-server /usr/local/bin/
sudo cp src/redis-cli /usr/local/bin/
sudo mkdir /etc/redis
sudo mkdir /var/redis
sudo cp utils/redis_init_script /etc/init.d/redis_6379
sudo cp redis.conf /etc/redis/6379.conf
sudo mkdir /var/redis/6379
sudo vim /etc/redis/6379.conf
```
編輯:
```
sudo update-rc.d redis_6379 defaults
```
3. 前五步驟 https://www.digitalocean.com/community/tutorials/how-to-set-up-a-firewall-with-ufw-on-ubuntu-16-04
```
sudo vim /etc/default/ufw
# => check ipv6
sudo ufw default deny incoming
sudo ufw default allow outgoing
sudo ufw allow ssh
sudo ufw allow 22
```
config/initilaize/sidekiq.rb
```
schedule_file = "config/schedule.yml"
if File.exists?(schedule_file) && Sidekiq.server?
Sidekiq::Cron::Job.load_from_hash YAML.load_file(schedule_file)
end
```
config/sidekiq.yml
```
---
:concurrency: 4
:queues:
- critical
- high
- default
- low
- mailers
```
https://medium.com/@thomasroest/properly-setting-up-redis-and-sidekiq-in-production-on-ubuntu-16-04-f2c4897944b5
1. 安裝 redis
2. 根據官方建議做好設定 https://redis.io/topics/quickstart
3. 設防火牆
4. 確定sidekiq 是用你剛剛設定的 port
5. 確定 sidekiq 是用 redis https://github.com/mperham/sidekiq/wiki/Using-Redis
6. 把 sidekiq 加到 systemd
7. 讓 capistrano 重啟 sidekiq
1, 2
```
wget http://download.redis.io/redis-stable.tar.gz
tar xvzf redis-stable.tar.gz
cd redis-stable
make
sudo cp src/redis-server /usr/local/bin/
sudo cp src/redis-cli /usr/local/bin/
sudo mkdir /etc/redis
sudo mkdir /var/redis
sudo cp utils/redis_init_script /etc/init.d/redis_6379
sudo cp redis.conf /etc/redis/6379.conf
sudo mkdir /var/redis/6379
sudo vim /etc/redis/6379.conf
```
編輯:
- Set daemonize to yes (by default it is set to no).
- Set the pidfile to /var/run/redis_6379.pid (modify the port if needed).
- Change the port accordingly. In our example it is not needed as the default port is already 6379.
- Set your preferred loglevel.
- Set the logfile to /var/log/redis_6379.log
- Set the dir to /var/redis/6379 (very important step!)
```
sudo update-rc.d redis_6379 defaults
```
3. 前五步驟 https://www.digitalocean.com/community/tutorials/how-to-set-up-a-firewall-with-ufw-on-ubuntu-16-04
```
sudo vim /etc/default/ufw
# => check ipv6
sudo ufw default deny incoming
sudo ufw default allow outgoing
sudo ufw allow ssh
sudo ufw allow 22
```
config/initilaize/sidekiq.rb
```
schedule_file = "config/schedule.yml"
if File.exists?(schedule_file) && Sidekiq.server?
Sidekiq::Cron::Job.load_from_hash YAML.load_file(schedule_file)
end
```
config/sidekiq.yml
```
---
:concurrency: 4
:queues:
- critical
- high
- default
- low
- mailers
https://medium.com/@thomasroest/properly-setting-up-redis-and-sidekiq-in-production-on-ubuntu-16-04-f2c4897944b5
2017年12月15日 星期五
bootstrap include grid
有時候會想要做到 include column 到自定義的 css class 裡面,可以這樣做:
```
@import "bootstrap";
.app {
@include make-row();
div {
border: solid 1px;
}
}
.main {
@include make-lg-column(8);
div {
border: solid 1px;
}
}
.sidebar {
@include make-lg-column(4);
}
.market {
.market-title {
@include make-lg-column(8);
}
.market-ticker {
@include make-lg-column(4);
}
}
```
```
@import "bootstrap";
.app {
@include make-row();
div {
border: solid 1px;
}
}
.main {
@include make-lg-column(8);
div {
border: solid 1px;
}
}
.sidebar {
@include make-lg-column(4);
}
.market {
.market-title {
@include make-lg-column(8);
}
.market-ticker {
@include make-lg-column(4);
}
}
```
2017年12月12日 星期二
RSpec 原來還可以在 factory 下面再用 factory
RSpec 原來還可以在 factory 下面再用 factory
這樣就可以用
```
create(:tiny_btc_account)
```
```
FactoryGirl.define do
factory :account do
locked { "0.0".to_d }
balance { "0.0".to_d }
trait :usd do
currency :usd
end
trait :btc do
currency :btc
end
trait :small do
after :create do |account|
account.plus_funds 10, reason: Account::DEPOSIT
end
end
trait :tiny do
after :create do |account|
account.plus_funds 1, reason: Account::DEPOSIT
end
end
factory :tiny_btc_account, traits: [:tiny, :btc]
factory :tiny_usd_account, traits: [:tiny, :usd]
factory :small_btc_account, traits: [:small, :btc]
factory :small_usd_account, traits: [:small, :usd]
end
end
```
這樣就可以用
```
create(:tiny_btc_account)
```
```
FactoryGirl.define do
factory :account do
locked { "0.0".to_d }
balance { "0.0".to_d }
trait :usd do
currency :usd
end
trait :btc do
currency :btc
end
trait :small do
after :create do |account|
account.plus_funds 10, reason: Account::DEPOSIT
end
end
trait :tiny do
after :create do |account|
account.plus_funds 1, reason: Account::DEPOSIT
end
end
factory :tiny_btc_account, traits: [:tiny, :btc]
factory :tiny_usd_account, traits: [:tiny, :usd]
factory :small_btc_account, traits: [:small, :btc]
factory :small_usd_account, traits: [:small, :usd]
end
end
```
2017年12月10日 星期日
PG::ConnectionBad: could not connect to server
今天遇到一個問題
我安裝 postgresapp 並執行了 server 但是 rails 找不到並噴了下面的 error:
```
➜ rails db:create
could not connect to server: No such file or directory
Is the server running locally and accepting
connections on Unix domain socket "/var/pgsql_socket/.s.PGSQL.5432"?
Couldn't create database for {"adapter"=>"postgresql", "encoding"=>"unicode", "pool"=>5, "database"=>"crypto_trader_development"}
rails aborted!
PG::ConnectionBad: could not connect to server: No such file or directory
Is the server running locally and accepting
connections on Unix domain socket "/var/pgsql_socket/.s.PGSQL.5432"?
```
首先檢查 socket 有沒有開:
```
➜ netstat -ln | grep PGSQL
92b93fdd84f73f stream 0 0 92b93fcc8bd9ef 0 0 0 /tmp/.s.PGSQL.5432
```
看起來是有,但是位置不對, rails 找的位置是 `/var/pgsql_socket/.s.PGSQL.5432` 然而實際位置是 `/tmp/.s.PGSQL.5432`
網路上很多解決方法,例如
加上 symlink
改 postgres 的 config 檔案
但後來我只是加了一行到 `.zshrc` 就解決了
```
https://github.com/PostgresApp/PostgresApp/issues/48#issuecomment-285452823
我安裝 postgresapp 並執行了 server 但是 rails 找不到並噴了下面的 error:
```
➜ rails db:create
could not connect to server: No such file or directory
Is the server running locally and accepting
connections on Unix domain socket "/var/pgsql_socket/.s.PGSQL.5432"?
Couldn't create database for {"adapter"=>"postgresql", "encoding"=>"unicode", "pool"=>5, "database"=>"crypto_trader_development"}
rails aborted!
PG::ConnectionBad: could not connect to server: No such file or directory
Is the server running locally and accepting
connections on Unix domain socket "/var/pgsql_socket/.s.PGSQL.5432"?
```
首先檢查 socket 有沒有開:
```
➜ netstat -ln | grep PGSQL
92b93fdd84f73f stream 0 0 92b93fcc8bd9ef 0 0 0 /tmp/.s.PGSQL.5432
```
看起來是有,但是位置不對, rails 找的位置是 `/var/pgsql_socket/.s.PGSQL.5432` 然而實際位置是 `/tmp/.s.PGSQL.5432`
網路上很多解決方法,例如
加上 symlink
改 postgres 的 config 檔案
但後來我只是加了一行到 `.zshrc` 就解決了
```
export PGHOST=localhost
```https://github.com/PostgresApp/PostgresApp/issues/48#issuecomment-285452823
Disable 煩人的 zsh 更新檢查
```
vim ~/.zshrc
```
```
DISABLE_AUTO_UPDATE="true"
```
before the source $ZSH/oh-my-zsh.sh
reference: https://stackoverflow.com/questions/11378607/oh-my-zsh-disable-would-you-like-to-check-for-updates-prompt
quick start with rails new
筆記一下 rails 一個新的 project 的時候會用到的 commands
我喜歡用:
確切要執行的 commands:
```
rails _5.1.4_ new new_project -T -d postgresql --webpack=vue
```
add `gem 'rspec-rails'` to `Gemfile`
```
rails generate rspec:install
```
然後加上一些設定到 `.rspec`
```
--format documentation
```
另外還可以在主目錄加上 `.railsrc` 的設定
`~/.railsrc`
```
-T
-d postgresql
```
這樣以後 rails new 就預設 postgresql 跳過 mini test 了,oh ya~
references:
https://joesasson.github.io/2017/03/24/setting-up-a-rails-app-with-rspec-and-postgres.html
https://medium.com/@hpux/rails-5-1-loves-javascript-a1d84d5318b
我喜歡用:
- 可以自選版本(side project 喜歡用心一點的版本)
- 想要選擇要不要 enable webpacker
- 用 postgresql
- 不要 unit test,改用 rspec
確切要執行的 commands:
```
rails _5.1.4_ new new_project -T -d postgresql --webpack=vue
```
add `gem 'rspec-rails'` to `Gemfile`
```
rails generate rspec:install
```
然後加上一些設定到 `.rspec`
```
--format documentation
```
另外還可以在主目錄加上 `.railsrc` 的設定
`~/.railsrc`
```
-T
-d postgresql
```
這樣以後 rails new 就預設 postgresql 跳過 mini test 了,oh ya~
references:
https://joesasson.github.io/2017/03/24/setting-up-a-rails-app-with-rspec-and-postgres.html
https://medium.com/@hpux/rails-5-1-loves-javascript-a1d84d5318b
如何解決安裝 sql 相關 gem 時常常遇到的 error: Gem::Ext::BuildError: ERROR: Failed to build gem native extension.
因為是用 Postgresapp 安裝的 postgres sql,所以常常 bundle install 的時候都會遇到
```
Gem::Ext::BuildError: ERROR: Failed to build gem native extension.
ㄔ (0.21.0), and Bundler cannot continue.
Make sure that `gem install pg -v '0.21.0'` succeeds before bundling.
```
這樣的問題,其實這問題就是 gem 找不到安裝好的 postgres,只要指定路徑就行
如果 postgresapp 是最新版本的,那麼路徑就是
```
/Applications/Postgres.app/Contents/Versions/latest/bin
```
只要把 .zshrc 加上一段
```
PATH=$PATH:/Applications/Postgres.app/Contents/Versions/latest/bin
```
理論上再 bundle install 就可以了。
如果 postgresapp 不是最新版本的話就 cd 進去看看就行了
```
cd /Applications/Postgres.app/Contents/Versions
```
照上述的步驟設定好路徑就行了
手動一點的話也可以這樣:
```
gem install pg -- --with-pg-config=/Applications/Postgres.app/Contents/Versions/latest/bin/pg_config
```
happy coding
reference:
https://stackoverflow.com/questions/20754081/an-error-occurred-while-installing-pg-0-17-1-and-bundler-cannot-continue
```
Gem::Ext::BuildError: ERROR: Failed to build gem native extension.
ㄔ (0.21.0), and Bundler cannot continue.
Make sure that `gem install pg -v '0.21.0'` succeeds before bundling.
```
這樣的問題,其實這問題就是 gem 找不到安裝好的 postgres,只要指定路徑就行
如果 postgresapp 是最新版本的,那麼路徑就是
```
/Applications/Postgres.app/Contents/Versions/latest/bin
```
只要把 .zshrc 加上一段
```
PATH=$PATH:/Applications/Postgres.app/Contents/Versions/latest/bin
```
理論上再 bundle install 就可以了。
如果 postgresapp 不是最新版本的話就 cd 進去看看就行了
```
cd /Applications/Postgres.app/Contents/Versions
```
照上述的步驟設定好路徑就行了
手動一點的話也可以這樣:
```
gem install pg -- --with-pg-config=/Applications/Postgres.app/Contents/Versions/latest/bin/pg_config
```
happy coding
reference:
https://stackoverflow.com/questions/20754081/an-error-occurred-while-installing-pg-0-17-1-and-bundler-cannot-continue
2017年12月9日 星期六
開源到底要使用哪種授權?
由於常常用 Github 來放一些「反正也沒人會看,就公開給大家看吧也沒差」的「開源」專案來達到 不想花錢買 Private Repo 但又想用 Github 貢獻開源社區 的目的,但為了不要造成別人困擾,總是要加個 Licence 宣告一下版權,每次都是無腦使用 MIT,但也看到網上有些人會用 Apache v2 之類的授權,到底該怎麼選呢?
有個文章介紹了主流幾個開源協議,細節可以看這裡:
http://inspiregate.com/internet/trends/74-comparison-of-five-kinds-of-standard-open-source-license-bsd-apache-gpl-lgpl-mit.html
https://exygy.com/which-license-should-i-use-mit-vs-apache-vs-gpl/
但因為我很懶,所以做個懶人 cheat sheet :
什麼? Cheat sheet 還是太長了?
那就選 MIT 或是 Apache v2 吧。
What? 連二選一都嫌麻煩?
那就 MIT 吧。
有個文章介紹了主流幾個開源協議,細節可以看這裡:
http://inspiregate.com/internet/trends/74-comparison-of-five-kinds-of-standard-open-source-license-bsd-apache-gpl-lgpl-mit.html
https://exygy.com/which-license-should-i-use-mit-vs-apache-vs-gpl/
但因為我很懶,所以做個懶人 cheat sheet :
- 太麻煩了,我不想知道 Licence 細節: MIT
- 太麻煩了,我不想知道 Licence 細節,但我個性比較嚴謹: Apache v2
- 完全不 Care,隨便人用,也不保留版權:WTFPL
- 我想保留對這份文件的版權:MIT
- Apache v2 就是寫了比較多字的 MIT
- 保留版權,但不要拿我的名字當宣傳工具: BSD
- 不想讓別人商業使用: GPL
- 讓別人商業使用,但是若商業使用想改代碼要找我:LGPL
什麼? Cheat sheet 還是太長了?
那就選 MIT 或是 Apache v2 吧。
What? 連二選一都嫌麻煩?
那就 MIT 吧。
拓撲排序 - Topological Sorting
上一篇講到 DAG 有向無環圖 - Directed Acyclic Graph
這篇來研究 拓撲排序 - Topological Sorting
這篇文章講得很清楚:
https://songlee24.github.io/2015/05/07/topological-sorting/
就是在 DAG 中找到只出不進的點,然後移除,然後再繼續找只出不進的點移除,這樣依序移除的順序就是 拓撲排序

上面的排序就是 1 -> 2 -> 4 -> 3 -> 5
一个有向无环图可以有一个或多个拓扑排序序列。
這篇來研究 拓撲排序 - Topological Sorting
這篇文章講得很清楚:
https://songlee24.github.io/2015/05/07/topological-sorting/
在图论中,拓扑排序(Topological Sorting)是一个有向无环图(DAG, Directed Acyclic Graph)的所有顶点的线性序列。且该序列必须满足下面两个条件:
- 每个顶点出现且只出现一次。
- 若存在一条从顶点 A 到顶点 B 的路径,那么在序列中顶点 A 出现在顶点 B 的前面。
就是在 DAG 中找到只出不進的點,然後移除,然後再繼續找只出不進的點移除,這樣依序移除的順序就是 拓撲排序

上面的排序就是 1 -> 2 -> 4 -> 3 -> 5
一个有向无环图可以有一个或多个拓扑排序序列。
DAG - 有向無環圖 - Directed Acyclic Graph
最近想要研究一下 IOTA 在幹嘛,看到有中文翻譯白皮書 :https://hackmd.io/c/rkpoORY4W/https%3A%2F%2Fhackmd.io%2Fs%2FryriSgvAW
裡面提到 DAG 有向無環圖 - Directed Acyclic Graph
先看一下定義:
在圖論中,如果一個有向圖從任意頂點出發無法經過若干條邊回到該點,則這個圖是一個有向無環圖(DAG圖)。
https://zh.wikipedia.org/wiki/%E6%9C%89%E5%90%91%E6%97%A0%E7%8E%AF%E5%9B%BE
就是出去後就沒辦法繞回來的意思,這張圖很明顯:
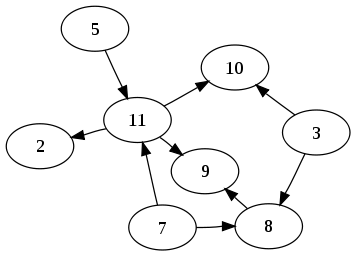
常見的「拓墣排序」好像就跟這個有關,有人提到 ETH 好像也有用到這個概念
拓扑排序,我们可以从寻找图中节点之间的路线,最短,以及最长的路线。通过动态规划,无论这张网多么庞大,都能以较快速度将结果正确计算出来。
比如闪电网络,ETH智能合约,为了找到正确的交易线路,使用DAG,拓扑来寻找路线
裡面提到 DAG 有向無環圖 - Directed Acyclic Graph
先看一下定義:
在圖論中,如果一個有向圖從任意頂點出發無法經過若干條邊回到該點,則這個圖是一個有向無環圖(DAG圖)。
https://zh.wikipedia.org/wiki/%E6%9C%89%E5%90%91%E6%97%A0%E7%8E%AF%E5%9B%BE
就是出去後就沒辦法繞回來的意思,這張圖很明顯:
常見的「拓墣排序」好像就跟這個有關,有人提到 ETH 好像也有用到這個概念
拓扑排序,我们可以从寻找图中节点之间的路线,最短,以及最长的路线。通过动态规划,无论这张网多么庞大,都能以较快速度将结果正确计算出来。
比如闪电网络,ETH智能合约,为了找到正确的交易线路,使用DAG,拓扑来寻找路线
關於拓撲排序:
https://songlee24.github.io/2015/05/07/topological-sorting/
2017年12月7日 星期四
網路安全相關 - JWT
JSON Web Token
https://jwt.io/
現在很流行用 JWT 當作 HTTP basic auth 的 token
通常會長這樣
```
header["Authorization"] = "Bearer <YOUR_JWT>"
```
什麼是 HTTP basic auth? 參考 這篇文章
為什麼呢? 要先簡單介紹 JWT 才能回答這個問題
JWT 其實就是一個協定告訴你怎麼產生 token
要產生 JWT 的 token 必須包含三個部分
1. header
2. payload
3. signature
header 裡面描述了想要加密用的演算法,用來產生 signature
payload 就是一些想要讓 client 可以解析的數據
signature 就是把 header 和 payload 用 server side 才知道的 secret key 加密產生出的一串字串,用來驗證資料正確性。 可以參考 摘要算法和對稱加密算法
把 header+payload+signature 分別用 Bas64 encode 之後就變成了 JWT token
格式長這樣
encoded_header.encoded_payload.encoded_signature
那回到一開始的問題,為什麼要用 JWT 呢?
主要原因就在於這個 token 是自帶資訊的,因為我們把 加密方式、想要傳達的訊息 都存在 token 裡面了,而且還加上了 簽名 用來確保訊息的正確性。
來看看實際面吧,假設我有個前端頁面想要跟 sever 溝通,以前的作法前端跟 server 拿 token 的時候, server 亂數產生一個 uniq 的 token 給前端,之後的每個 request 就帶這個 token 作為驗證的方式
流程一樣,但我們把「server 亂數產生一個 uniq 的 token 給前端」這件事改成「server 產生一個 JWT token 給前端」會發生什麼事(以及應該怎麼做)呢?
首先定義我的 paylaod
```json
{
user_id: 1,
name: "Wayne",
permissions: [
"read_account", "write_account"
]
expired_at: 1512624558 // unix time,
token: "my-uniq-token-from-server"
}
```
然後加密成 JWT token,把這個 token 傳給前端
有什麼好處呢?
1. 前端可以用 Base64 decode payload,這樣前端就可以直接從 token 就知道我提供給他的各種資訊,例如此例前端就可以知道這個 token 有哪些權限、什麼時候過期等等
2. Server 在收到帶有這個 token 的 request 的時候,也可以從 payload 直接判斷 token 過期了沒、有沒有操作權限
3. Server 不用擔心 payload 是不是被改動過,因為只要把 payload decode 出來並用依樣的加密方式加密比對 sinature 是否一樣就知道 paylaod 是否正確
https://jwt.io/
現在很流行用 JWT 當作 HTTP basic auth 的 token
通常會長這樣
```
header["Authorization"] = "Bearer <YOUR_JWT>"
```
什麼是 HTTP basic auth? 參考 這篇文章
為什麼呢? 要先簡單介紹 JWT 才能回答這個問題
JWT 其實就是一個協定告訴你怎麼產生 token
要產生 JWT 的 token 必須包含三個部分
1. header
2. payload
3. signature
header 裡面描述了想要加密用的演算法,用來產生 signature
payload 就是一些想要讓 client 可以解析的數據
signature 就是把 header 和 payload 用 server side 才知道的 secret key 加密產生出的一串字串,用來驗證資料正確性。 可以參考 摘要算法和對稱加密算法
把 header+payload+signature 分別用 Bas64 encode 之後就變成了 JWT token
格式長這樣
encoded_header.encoded_payload.encoded_signature
那回到一開始的問題,為什麼要用 JWT 呢?
主要原因就在於這個 token 是自帶資訊的,因為我們把 加密方式、想要傳達的訊息 都存在 token 裡面了,而且還加上了 簽名 用來確保訊息的正確性。
來看看實際面吧,假設我有個前端頁面想要跟 sever 溝通,以前的作法前端跟 server 拿 token 的時候, server 亂數產生一個 uniq 的 token 給前端,之後的每個 request 就帶這個 token 作為驗證的方式
流程一樣,但我們把「server 亂數產生一個 uniq 的 token 給前端」這件事改成「server 產生一個 JWT token 給前端」會發生什麼事(以及應該怎麼做)呢?
首先定義我的 paylaod
```json
{
user_id: 1,
name: "Wayne",
permissions: [
"read_account", "write_account"
]
expired_at: 1512624558 // unix time,
token: "my-uniq-token-from-server"
}
```
然後加密成 JWT token,把這個 token 傳給前端
有什麼好處呢?
1. 前端可以用 Base64 decode payload,這樣前端就可以直接從 token 就知道我提供給他的各種資訊,例如此例前端就可以知道這個 token 有哪些權限、什麼時候過期等等
2. Server 在收到帶有這個 token 的 request 的時候,也可以從 payload 直接判斷 token 過期了沒、有沒有操作權限
3. Server 不用擔心 payload 是不是被改動過,因為只要把 payload decode 出來並用依樣的加密方式加密比對 sinature 是否一樣就知道 paylaod 是否正確
HTTP basic auth
HTTP Basic access authentication
簡單版:
加一個 Authorization 的 Header,
解釋版:
https://zh.wikipedia.org/wiki/HTTP%E5%9F%BA%E6%9C%AC%E8%AE%A4%E8%AF%81
簡單版:
加一個 Authorization 的 Header,
解釋版:
https://zh.wikipedia.org/wiki/HTTP%E5%9F%BA%E6%9C%AC%E8%AE%A4%E8%AF%81
安全性相關 - CSRF
CSRF
跨站請求偽造,也被稱為 one-click attack 或者 session riding,通常縮寫為 CSRF 或者 XSRF
假設 User A 已經登入了 X 站,因為 A 的瀏覽器有存了 X 站相關的登入紀錄,當 A 進入 Y 站時,Y 站可以偷拿 A 的登入紀錄來訪問 X 站,這就是跨站請求偽造
rails 對這個的解法是加上 authenticate token,就是添加校驗 token,加 token 的方式是把 token 存在 session 裡,default 就是瀏覽器的 cookie (加密過的),然後在 form 裡面靠 `csrf_meta_tags` 這個 view helper 解密塞到 form 裡面,那麼後端就可以藉由比對:「塞在 form 裡面的 token 是不是跟 session 裡面解密後的 token 一樣」來驗證
所以說 CSRF:
1. 在同一個 session 內, token 都是一樣的,所以如果被知道了還是可以通過驗證
2. 但其他站很難知道,因為 cookie 是加密的,其他站不知道怎麼解出 cookie 找到 token
這篇文章解釋得滿清楚的:
https://medium.com/rubyinside/a-deep-dive-into-csrf-protection-in-rails-19fa0a42c0ef
那怎麼破解呢?
最先想到的方法是(未證實)
1. 使用者進來我的 Y 站的時候,我拿使用者的資訊送 GET request 訪問有包含 CSRF token 的 form 頁面
2. 想辦法把這個頁面截下來(html dom 之類的)
3. 解析這個頁面的 dom 找到 csrf token
4. 在使用者在 Y 站做其他操作時把剛剛解析到的 csrf token 加上並做跨站請求偽造
補上 wiki 對 CSRF 的解釋:
https://zh.wikipedia.org/wiki/%E8%B7%A8%E7%AB%99%E8%AF%B7%E6%B1%82%E4%BC%AA%E9%80%A0
跨站請求偽造,也被稱為 one-click attack 或者 session riding,通常縮寫為 CSRF 或者 XSRF
假設 User A 已經登入了 X 站,因為 A 的瀏覽器有存了 X 站相關的登入紀錄,當 A 進入 Y 站時,Y 站可以偷拿 A 的登入紀錄來訪問 X 站,這就是跨站請求偽造
rails 對這個的解法是加上 authenticate token,就是添加校驗 token,加 token 的方式是把 token 存在 session 裡,default 就是瀏覽器的 cookie (加密過的),然後在 form 裡面靠 `csrf_meta_tags` 這個 view helper 解密塞到 form 裡面,那麼後端就可以藉由比對:「塞在 form 裡面的 token 是不是跟 session 裡面解密後的 token 一樣」來驗證
所以說 CSRF:
1. 在同一個 session 內, token 都是一樣的,所以如果被知道了還是可以通過驗證
2. 但其他站很難知道,因為 cookie 是加密的,其他站不知道怎麼解出 cookie 找到 token
這篇文章解釋得滿清楚的:
https://medium.com/rubyinside/a-deep-dive-into-csrf-protection-in-rails-19fa0a42c0ef
那怎麼破解呢?
最先想到的方法是(未證實)
1. 使用者進來我的 Y 站的時候,我拿使用者的資訊送 GET request 訪問有包含 CSRF token 的 form 頁面
2. 想辦法把這個頁面截下來(html dom 之類的)
3. 解析這個頁面的 dom 找到 csrf token
4. 在使用者在 Y 站做其他操作時把剛剛解析到的 csrf token 加上並做跨站請求偽造
補上 wiki 對 CSRF 的解釋:
https://zh.wikipedia.org/wiki/%E8%B7%A8%E7%AB%99%E8%AF%B7%E6%B1%82%E4%BC%AA%E9%80%A0
2017年12月6日 星期三
Bitfinex Margin 懶人做空範例
範例:
做空 IOTA
步驟
1. 2.92 (當時的價格) 買進 100 顆
2. 下一個 stop limit buy 在 3.199 時觸發用 3.22 買進確保最多虧 10% 左右
3. 下一個 limit buy 在 2.62 在賺 10% 時收割
如果是 margin order,則是三倍槓桿,所以 10% 虧損或是利潤 = 10% * 3 = 30% 的真實虧損或是利潤


做空 IOTA
步驟
1. 2.92 (當時的價格) 買進 100 顆
2. 下一個 stop limit buy 在 3.199 時觸發用 3.22 買進確保最多虧 10% 左右
3. 下一個 limit buy 在 2.62 在賺 10% 時收割
如果是 margin order,則是三倍槓桿,所以 10% 虧損或是利潤 = 10% * 3 = 30% 的真實虧損或是利潤


2017年12月5日 星期二
2017年12月2日 星期六
終於在工作中實際用到了紅黑樹 - 交易所配對引擎
首先了解紅黑樹跟一般的二分查找樹的區別可以看下面連結中的漫畫,清楚明瞭:
https://mp.weixin.qq.com/s/0RKuO0Pk7R09wGzgyA43mw
簡單來講最大的差別在於
二分查找樹有可能會左右極度不平衡,造成查找時效率變慢
而紅黑樹有自平衡系統,可以確保樹的深度是平衡的,缺點是增加或是減少節點時會比較耗資源
最近在開發交易所,研究了 Peatio 的交易所撮合引擎,其中有一段就有用到紅黑樹
確切的 code 在這:https://github.com/peatio/peatio/blob/master/app/models/matching/order_book.rb#L11
所以不禁就想問為什麼這邊要用紅黑樹呢?
原因就是因為在這個演算法中我們是根據 order 的 price 來當排序,假設交易所的 orders 中我們第一個 laoding 進來的 order 是最便宜的或是最貴的,那麼用 binary tree 就會變成左右極不平衡的情況,造成搜尋效率低落,相對的如果用紅黑樹就可以讓整個樹長成左右平衡的大樹,這樣搜尋效率就比較高。
其實 base on 演算法的實作,在 peatio 的演算法中是把 orders 一次 load 進 memory 裡面,所以只有在第一次 loading orders 的時候會花很多資源在紅黑樹自平衡,但一但 loading 完之後大部分的時候都會是在查找 order 而不是新增刪除 order,所以這樣的設計是比較合理的。
查找 order 的部分:https://github.com/peatio/peatio/blob/master/app/models/matching/order_book.rb#L44
https://mp.weixin.qq.com/s/0RKuO0Pk7R09wGzgyA43mw
簡單來講最大的差別在於
二分查找樹有可能會左右極度不平衡,造成查找時效率變慢
而紅黑樹有自平衡系統,可以確保樹的深度是平衡的,缺點是增加或是減少節點時會比較耗資源
最近在開發交易所,研究了 Peatio 的交易所撮合引擎,其中有一段就有用到紅黑樹
確切的 code 在這:https://github.com/peatio/peatio/blob/master/app/models/matching/order_book.rb#L11
所以不禁就想問為什麼這邊要用紅黑樹呢?
原因就是因為在這個演算法中我們是根據 order 的 price 來當排序,假設交易所的 orders 中我們第一個 laoding 進來的 order 是最便宜的或是最貴的,那麼用 binary tree 就會變成左右極不平衡的情況,造成搜尋效率低落,相對的如果用紅黑樹就可以讓整個樹長成左右平衡的大樹,這樣搜尋效率就比較高。
其實 base on 演算法的實作,在 peatio 的演算法中是把 orders 一次 load 進 memory 裡面,所以只有在第一次 loading orders 的時候會花很多資源在紅黑樹自平衡,但一但 loading 完之後大部分的時候都會是在查找 order 而不是新增刪除 order,所以這樣的設計是比較合理的。
查找 order 的部分:https://github.com/peatio/peatio/blob/master/app/models/matching/order_book.rb#L44
訂閱:
文章 (Atom)